Wednesday, August 30, 2017

O2 Trim in combustion PID logic

O2 Trim

The O2 sensor detects the "excess air" - the % oxygen present in the flue gas after combustion. Typically at high loads, 3-4% Ois desirable (earth's atmosphere is 21% O2).
It is dangerous to put more fuel into a furnace than the air can fully combust. The products of incomplete combustion (synthesis gas is H2 and CO) or unburned fuel could fill a space in the furnace or ductwork, then later mix with air and explode. Insufficient air also results in environmentally undesirable emissions.
Too much excess air is a major cause of inefficiency. We want to heat water, but we must bring cold air (mostly nitrogen) into the furnace and exhaust warm air. The more air we blow through the furnace, the more fuel we burn just to heat nitrogen to blow out the stack instead of heating water. Excess air can also produce excess NOx in some burners.
So we want to control O2 at its ideal amount for the load. The burner manufacturer should provide an O2 trim SP curve - this should be plugged into a PWC with the output running through a bias station (always in auto!) to set the SP of the O2 trim PID loop. Operators should NOT have the option to set the O2 Trim SP - they can put the loop in manual, but in auto, the SP should always come from the biased SP curve. The O2 trim loop will then adjust the air flow PV, causing the air flow loop to add or subtract air to maintain it at the same % as the fuel flow % and boiler master %. Burner O2 trim is typically limited to adjust the air by only ±10% to ±20%.
This trim requires a bit of math in the CCS logic. There are three common ways to handle this:
  1. The old-school method was to have an O2 trim loop with an output scaled 0-100%. 50% is "neutral" or "centered" - no adjustment to the FAR output. The output is clamped to something like 40-60%, and that output is added to 50% (or subtracted from 150%) and then multiplied by 0.01 and the air flow FAR PWC output for the flow loop PV.
  2. Some modern systems have the output limited to 0.8 to 1.2, with 1.0 being centered. The output of the air flow FAR PWC can then be multiplied by the O2 trim output to set the air flow PV. This is the most simple scheme to program.
  3. Other modern systems have the output limited from -20% to +20%, with 0% being centered. The output is then divided by 100%, added to 1 (or subtracted from 1), and multiplied by the air flow FAR PWC output to set the air flow PV. This is a bit more complicated to program, but is more natural for operators to understand, since zero is centered.
The direction of the O2 trim loop depends on how the internal math is configured - some are direct acting (raising their outputs in response to high or rising O2), while others are reverse acting.

Saturday, February 25, 2012

Why vibration probes are installed in X-Y manner?

Use orbit, timebase, and shaft centerline plots to display shaft motion. The most common use for the orbit, timebase, and shaft centerline plots is to monitor turbomachinery with fluid film bearings. Some turbomachinery mechanical faults have characteristic plot shapes. You can compare the acquired plots with any known characteristics to detect faults and diagnose machine problems.

You mount two proximity probes orthogonally on a fluid film bearing to acquire the signals for the orbit, timebase, and shaft centerline plots. An orbit plot shows the dynamic motion of the center of a rotating shaft with signals from two proximity probes. A timebase plot displays dynamic vibration amplitude information with the same proximity probe signals as the orbit plot. The timebase plot displays the signals as a function of time in one or more revolutions with two separate plots. A shaft centerline plot displays the shaft center DC position changes within a bearing clearance range. An orbit plot represents the shaft center AC dynamic motion. Use a shaft centerline plot with an orbit plot to track both aspects of shaft motion.

The following illustration shows how you might configure a system to display an orbit plot and a shaft centerline plot.

shaft_cntrline_orbit


In the previous illustration, two orthogonally-mounted proximity probes measure the shaft motion. The outer circle depicts the bearing clearance. As the shaft speeds up in the counterclockwise (CCW) rotation direction, the shaft center moves from the bottom of the bearing clearance to the normal operational center, as the Shaft Centerline shows. As the shaft continues in normal operation, the shaft center moves around the normal operating center, as the Shaft Orbit shows.

Orbit Plot

An orbit plot generates a two-dimensional image of the shaft center motion. Use the OA Orbit Plot VI to display both filtered and unfiltered orbit plots. An unfiltered orbit plot displays the shaft motion based on even-angle signal data. The unfiltered plot shows the direct motion of the shaft center and displays all orders. A filtered orbit plot displays the shaft motion based on vector signal data. The filtered plot shows the synchronous motion of a particular order.

The following illustration shows a filtered orbit plot and the typical setup for monitoring a rotating shaft with an orbit plot.

orbit_plot

The X and Y proximity probes, which are two probes of the same type mounted 90 degrees apart, monitor the shaft. If you do not use two orthogonally-mounted probes, the orbit plot might appear skewed.

Probe Angle Correction

In many cases, you cannot mount probes easily in the desired 90 degrees out of phase horizontal and vertical orientation. Probes often have a 45-degree deviation instead. The following illustration shows the common mounting positions for X and Y probes.


probe_angle_1

An orbit plot assumes that the signals are from probes in true horizontal and vertical positions. To display data with respect to a true vertical and horizontal coordinate system, you must rotate the data by the probe angular offset from the desired coordinates. The following illustration shows the effect of compensating for a 45-degree mounting position.


probe_angle_2

You can use the OAT Orbit Plot VI to rotate an orbit plot to the true horizontal and vertical probe orientations.

Timebase Plot

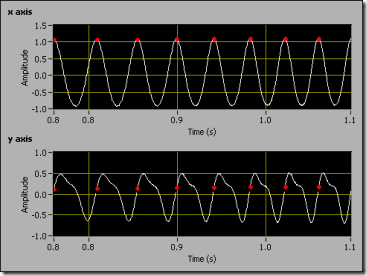
A timebase plot displays the vibration amplitude of one or more revolutions of a shaft as a function of time. Whereas an orbit plot shows the whole picture of the rotating shaft, a timebase plot enables you to get a clearer picture of what an individual transducer acquires in terms of vibration amplitude. The timebase plot follows the same convention as the orbit plot. The following front panel shows a typical unfiltered timebase plot for the x-axis and y-axis.

typ_unfilt_timebase_plot

In the previous plot, each dot represents the trigger pulse position.

Use the OA Timebase Plot VI to display both unfiltered and filtered timebase plots. An unfiltered timebase plot displays the shaft vibration with an even-angle signal. A filtered timebase plot displays the shaft vibration with a vector signal. The filtered timebase plot shows only the synchronous motion of a certain order.

Shaft Centerline Plot

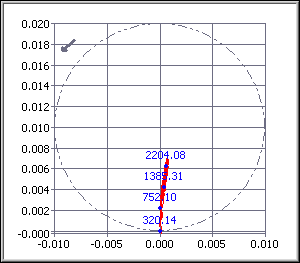
Use a shaft centerline plot to display changes in radial rotor position with respect to a stationary bearing over a range of time or speed. The DC gap voltage from two orthogonally-mounted proximity probes determines the averaged position change. The following illustration shows a typical shaft centerline plot of a machine startup.

The numeric values on the above plot correspond to the rotational speed.

Displaying a Shaft Centerline Plot

You can use the OAT DC Gap Estimator VI to compute the DC gap values from the X and Y proximity probes. You then can use the OAT Shaft Centerline Plot VI to display the shaft centerline plot with DC gaps.

The shaft centerline plot follows the same true vertical and true horizontal convention as the orbit plot. You can use the OAT Shaft Centerline Plot VI to rotate the plot to true vertical and true horizontal positions.

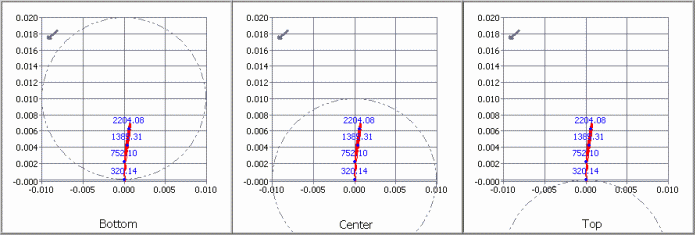
When displaying a shaft centerline plot, you must specify the bearing clearance and shaft centerline starting point reference. Three types of starting point references are as follows:

  • Bottom—Use the bottom starting point reference for a horizontal machine train.
  • Center—Use the center starting point reference for a vertical machine train.
  • Top—Use the top starting point reference for overhung rotors, such as fans and compressors.

The following illustration shows three shaft centerline plots with different start point references.

You can see that the starting point reference you choose affects the boundary position of the bearing clearance in a shaft centerline plot.

Thursday, February 2, 2012

Vibration measurement fundamentals

1. The following comments apply to a the application of machinery protection and asset management systems for rotating machinery with hydrodynamic or fluid film bearings. The extent to which various parameters are recommended to be measured (and monitored) is directly proportional to how critical the machinery asset is to the continued, uninterrupted operation of the plant or process.  For example, some machines such as turbine generators, compressors, and larger mechanical drive steam turbines, are found in the critical paths of many plant processes. Other types such as small motors, pumps and fans are non-critical or semi-critical machines. Therefore, the  recommendations for monitoring compressors will generally be more rigorous and extensive than those for fans. Machine measurements must be correlated with process variable measurements in order to obtain a complete understanding of machinery behavior as well as providing adequate machinery protection.

2. The bearing type plays an important role in determining what the appropriate transducer suite should be.  For example, semi-critical or non-critical machinery with rolling element bearings are usually adequately monitored via a single seismic transducer mounted radially at each bearing.  Rolling element bearings have little or no damping which usually results in good transmissibility of the rotor’s vibration to the casing and due to the mechanical nature of the bearing itself, when it fails inevitably the vibration amplitude will increase.  However, this is not the case for turbomachinery with hydrodynamic (fluid film) bearings.  In order to properly monitor critical turbomachinery operating in hydrodynamic or fluid film bearings the shaft relative measurement utilizingproximity (displacement) probes must be a part of a properly engineered offering.   XY (orthogonal; i.e. at 90°) proximity probes at each radial bearing are mandatory.  There are no exceptions to this rule.   From an engineering principle / best practices perspective it would not be acceptable to only use one proximity probe as opposed to installing two proximity probes, orthogonally mounted (90° apart).  If only one probe is installed, dyanmic motion (vibration) will only be seen in the same plane as the longitudinal axis of the installed probe; i.e. in line with the transducer.   

3. Reminding ourselves of the 1st Law of Machinery Diagnostics which states that Displacement = Force / Stiffness we recognize:

i. If the force (a vector quantity) changes, the displacement (also a vector quantity) will change

ii. Likewise if the force remains constant, but the stiffness (also a vector quantity) changes, the displacement will change

4. Let’s focus on the second item for just a moment.  In the presence of a constant force due to unbalance[1] and an asymmetrical support stiffness[2] which exists with most turbomachinery, we realize that the resulting vibration displacement will vary as the constant unbalance force rotates and encounters a continually varying, asymmetric support stiffness.  If we were to plot this motion, we would generate an elliptical shape; i.e. the shaft relative orbit, which would accurately depict the motion of the centerline of the shaft in the radial or xy plane.  Maximum vibration will occur along the major axis of the ellipse (plane of lowest support stiffness) while along the minor axis of the ellipse, the vibration response will be at its minimum because the support stiffness is maximum.  More than likely, the major axis of the ellipse (plane of maximum shaft vibration) will not be aligned with either the x or y proximity probe.  Consequently by itself, as a single plane measurement, neither probe will see the maximum vibration.  However, it can be observed by noting the vibration amplitude along the major axis of the ellipse or by calculating Smax.  However, in order to either generate the shaft relative orbit or calculate Smax,  xy transducers must be installed at 90°.  These measurements cannot be made with a single plane measurement.  The worst case scenario occurs when the major axis of the ellipse (plane of maximum vibration) is rotated 45° with respect to the angular location of the proximity probe.  For this case, the proximity probe will only see 71% of the maximum vibration because the plane of maximum vibration is rotated 45° from the axis of the transducer.

5. The following vibration signal characteristics are critical when evaluating the health of  turbomachinery operating in hydrodynamic bearings:

· overall vibration amplitude

· vibration frequency

· filtered vibration amplitude; i.e. 1X, 2X, nX  (requires once per turn phase trigger probe as a phase reference)

· determining actual maximum vibration amplitude (requires xy proximity probes)

· shape or form of the vibration, i.e. orbit  (requires xy proximity probes)

· vibration precession; vibration either in the direction of or opposite of the direction of rotation  (requires xy proximity probes)

· rotor operating deflection and  / or mode shape  (requires xy proximity probes)

· shaft average centerline radial position (requires xy proximity probes)

· identification and evaluation of support stiffness asymmetry  (requires xy proximity probes)

· full spectrum  (requires xy proximity probes)

· Smax vibration amplitude  (requires xy proximity probes)

6. It should be noted that the selection of any transducer / monitoring / protection / information system often involves compromises.  There is a point that must be made at this time.  There are no absolutes and there is no one machinery protection or management system that is adequate or capable of detecting any and all machinery malfunctions or potential failures.  The recommendations offered here apply universally to the most common design configurations and process applications, but as with any general set of rules, there will be exceptions.  There always is and always will be a trade-off between the complexity of the transducer suite / monitoring and / or information systems and the economic justification for enhanced performance of the protection / information system.  The technical priorities are weighed against the economic considerations and a decision is made.  

7. In general, it is important to recognize that in order to determine the optimum protection system for any turbomachinery train, each piece of machinery must be evaluated individually. Often adequate data is not available for a detailed analysis of a particular machine's expected behavior under normal and malfunction conditions. It then becomes necessary to use sound engineering principles in order to “install what is right” as opposed to “install what is easy”.

8. End users should fully understand the value of the information that the transducer suite / vibration monitoring system is providing to them and how to turn this information into productive tasks and actions.  At times, end users are  not aware of the total information that is available from a properly engineered, installed, and commissioned transducer suite / machinery protection system.  Having the correct information at the right time is mandatory in order to properly manage units in order to achieve the desired unit availability goals, mitigate risk, and better plan for upcoming outages.

9. A good tool to use to evaluate where you are is a “risk assessment”. It starts with a careful evaluation of all relevant data to determine current status, where the end user wants (or needs) to go, and what needs to be done so that the end user can achieve the established goal(s). One deliverable from the risk assessment is a prioritized action plan. This action plan should communicate whether the current transducer suite / machinery protection system(s) is adequate. 

At a minimum, the risk assessment should include:

•          A review of current business objectives and contractual obligations.

•          Quantify past and present unit performance, maintenance history, and unit availability.

•          Review and quantify previous operational, maintenance and machinery failures and their impact on unit availability.

•          Review existing data relative to any previous failures, maintenance history and unit availability.

•          Evaluate current system status and capabilities.

•          Quantify expected return on investment of expected changes or improvements.

_________________________________________________________________________________

[1] A fixed mass at a fixed radius rotating at operating speed generating a constant, uniform force in all directions

[2]Nnon-uniform support stiffness; i.e. different vertical support stiffness vs. horizontal stiffness.

Tuesday, January 10, 2012

Power and Control Cables


POWER / CONTROL CABLES


Voltage Grade
-
Upto 1100 V
Cores
-
Single / Multicore
Conductor
-
Electrolytic grade copper Bare / Tinned, Solid / Stranded / Flexible conductors.
Range
-
Single Core 1.5 to 400 Sq.mm, Multi Core upto 50 Sq.mm, 1.5 Sq.mm & 2.5 Sq.mm. upto 61 Cores.
Primary Insulation
-
General Purpose PVC / Hear Resistant PVC / LDPE / XLPE / LSF /PTFE / Fibre Glass.
Inner Sheathing
-
PVC / HRPVC / FR PVC / FRLS PVC / ZHFR / LSF / Fibre Glass
Armouring
-
GI Round Wire / Flat strip.
Outer Sheathing
-
General purpose PVC / HRPVC / FRLS PVC / ZHFR
Standards
-
IS - 694, IS – 1554 (Part-I), IS-7098 (Part-I) & IEC 60502-1, IEC-60332.
CORE Identification
Cores shall be identified by different colours of PVC insulation. Following colour scheme shall be adopted -
1 Core
-
Any Single colour.
2 Cores
-
Red and Black.
3 Cores
-
Red, Yellow & Blue.
4 Cores
-
Red, Yellow, Blue & Black.
5 Cores
-
Red, Yellow, Blue, Black & Grey.
6 Cores and above
-
Two adjacent cores (counting and direction core) in each layer, Blue And Yellow, remaining cores Grey.

In addition to these, combinations from the following colours can also be offered -
Red, Black, Blue, Green, Grey, Orange, Violet, White, Yellow.

Alternately, any single colour insulation on all cores with number printing can also be provided.
Designation Code
Y
--
PVC insulation
W
--
Steel round wire armour
F
--
Steel strip armour
WW
--
Steel double round wire armour
FF
--
Steel strip double armour
Y
--
PVC outer sheath
A
--
Aluminium conductor
No Abbreviations used when the conductor material is Copper.

Thermocouple Cables


THERMOCOUPLE EXTENSION / COMPENSATING LEADS CABLES


Voltage Grade
-
Upto 1100 V
Cable Code
-
KX, KX(A), TX, JX, EX, SX /RX, BX, NX, UX, WX
Construction
-
Single or Multiple Pairs
Range
-
16 AWG / 18 AWG / 20 AWG / 20 AWG upto 20 Pair
Primary Insulation
-
General purpose PVC / HEAT RESISTANT PVC / LDPE / XLPE / PTFE / Fibre Glass / XLPE
Screening
-
Individual and / or overall with Aluminium Mylar / Copper Tape or with Tinned, Bare, Nickel Copper / Stainless Steel
Inner Sheath
-
PVC/ HRPVC / FR PVC / FRLS PVC / ZHFR / LSF / PTFE / Fibre Glass / ZHFR.
Armouring
-
GL round Wire / Flat strip
Outer sheath
-
PVC / HRPVC / FR PVC / FRLS PVC / ZHFR / LSF / PTFE / Fibre Glass / ZFHR.
Standards
-
ANSI:MC-96.1, IS-8784, DIN, BS, IEC 584-3 AND IEC-60332
Rip cord
-
For easy removal of sheath.

Instrumentation Cables


Instrumentation Screened Cables & Thermocouple Compensating Cable

Sl No.

1 Pair X 1.5mm2 Signal Cable
2 Pair X 1.5mm2 Multicore Signal Cable
12 Pair X 0.5mm2Multicore Signal Cable
1 Pair X 1.5mm2 T/C Extn. Cable/
Comp. Cable
6 Pair X 0.5mm2 T/C Extn. Cable/
Comp. Cable
12 Pair X 0.5mm2 T/C Extn. Cable/ Comp. Cable
1 Triad X 1.5mm2 RTD Signal Cable
6 Triad X 0.5mm2 RTD Signal Cable
3 Core X 1.5mm2
Power Cable


(Armoured & Screened)
(Unscreened
Armoured )
1.
General Application Std.


BS5308(Part-2)


IS-8130 / 84
Yes
Yes
Yes
Yes and
Yes and
Yes and
IS-8130/84
IS-8130/84
IS-8130/84
IS-5831 / 84


ANSI-MC 96.1
ANSI-MC 96.1
ANSI-MC 96.1


IS-3975 / 88


2.
Voltage Grade (RMS) Volts
660 / 1100 V
660 / 1100 V
660 / 1100 V
660 V
660 V
660 V
660 / 1100V
660 / 1100V
1100 V

3.
Operating Temp. in Deg. C
90
90
90
90
90
90
90
90
90

Numbers of Cores/Pairs / Triad
1 Pair
2 Pair
12 Pair
1 Pair
6 Pair
12 Pair
1 - Triad
6 - Triad
3 core
(A) CONDUCTOR

Material & Standard
Annealed Copper
Annealed Copper
Annealed Copper
+VE Chromel/
Copper/ -VE Alumel/Cu-Ni Alloy
+VE Chromel/ Copper/ -VE Alumel/Cu-Ni Alloy
+VE Chromell/ Copper/ -VE Alumel/Cu-Ni Alloy
Annealed Copper
Annealed Copper
Annealed Copper

Conforming To
IS - 8130/84
IS - 8130/84
IS - 8130/84
ANSI MC. 96.1/ IS : 8784-1987
IS - 8130/84
IS - 8130/84
IS - 8130/84


Grade
Electrolytic
Electrolytic
Electrolytic
KX / KX(A)
KX / KX(A)
KX / KX(A)
Electrolytic
Electrolytic
Electrolytic


No. of Strand/Dia of each Strand (mm)
48/0.2 OR
7/0.53
48/0.2 OR
7/0.53
16/0.2 OR
7/0.3
1/16 AWG
1/20 AWG
3x22 SWG
1/16 AWG
1/20 AWG
3x22 SWG
1/16 AWG
1/20 AWG
3x22 SWG
48/0.2 OR
7/0.53
16/0.2 OR
7/0.3
48/0.2 OR
7/0.53


Pair Identification (by Number markings on Cores at an interval of 250 mm or by number tape on each Core)
Yes
Yes
Yes
Yes
Yes
Yes
Yes
Yes
Yes


Form of Conductor
Round
Round
Round
Round
Round
Round
Round
Round
Round


Area of Cross Section
(sq. mm)
1.5
1.5
0.5
1.5
0.8 OR 1.5
0.8 OR 1.5
1.5
0.5
1.5


Insulation Resitance at 20oC Meg. Ohms/Km (min.)
100
100
100
100
100
100
100
100
100


Inductance (Max)
Millnry/Km
0.9
0.9
0.9
0.9
0.9
0.9
0.9
0.9
N.A.


L/R Ratio (Max)
Microhenry/Km
40
40
25
40
25
25
40
25
N.A.

Communication Pair
NO
NO
YES
NO
YES
YES
NO
YES
NO
(B) INSULATION

Insulation PVC Type-A or C 0.6mm nominal thickness to IS-5831/84
Yes
Yes
Yes
Yes
Yes
Yes
Yes
Yes
yes


Colour Code BS:5308(Part-2) or ANSI or IS:8784
Yes
Yes
Yes
Yes
Yes
Yes
Yes
Yes
yes
Tolerance on drum length (+/-5%)
Yes
Yes
Yes
Yes
Yes
Yes
Yes
Yes
Yes
Bending Radius 12 X 0.0
Yes
Yes
Yes
Yes
Yes
Yes
Yes
Yes
Yes
(C) SCREENING / SHIELDING (individual + overall) for multi pair

Material
Aluminium Backed Mylar Tape
Aluminium
Backed Mylar Tape
Aluminium
Backed Mylar Tape
Aluminium
Backed Mylar
Tape
Aluminium
Backed Mylar
Tape
Aluminium
Backed Mylar
Tape
Aluminium
Backed Mylar
Tape
Aluminium
Backed Mylar
Tape
N.A.


Percentage Coverage
100%
100%
100%
100%
100%
100%
100%
100%
N.A.


Overlap %
25%
25%
25%
25%
25%
25%
25%
25%
N.A.


Thickness (mm) min. 0.05
Yes
Yes
Yes
Yes
Yes
Yes
Yes
Yes
N.A.
(D) INNER SHEATH

Material PVC / HR PVC FRLS
Yes
Yes
Yes
Yes
Yes
Yes
Yes
Yes
Yes


Type & Standard to which IT conforms
IS-5831/84, ASTM, IEEE
Yes
Yes
Yes
Yes
Yes
Yes
Yes
Yes
Yes


Extruded (Yes)
Yes
Yes
Yes
Yes
Yes
Yes
Yes
Yes
Yes


Thickness Min. (mm)
0.3
0.3
0.3
0.3
0.3
0.3
0.3
0.3
0.3


Colour BS: 5308(Part-2)
Yes
Yes
Yes
Yes
Yes
Yes
Yes
Yes
Black


Ripchord shall be provided
Yes
Yes
Yes
Yes
Yes
Yes
Yes
Yes
Yes
(E) ARMOURING

Material &Type of Armour
(Galvanised Steel Wire / Strip)
Yes
Yes
Yes
Yes
Yes
Yes
Yes
Yes
Yes


Standard to which it conforms IS-3975/88
Yes
Yes
Yes
Yes
Yes
Yes
Yes
Yes
Yes


Size
0.9 mm
0.9 mm
4x0.8 mm
0.9 mm
4x0.8 mm
4x0.8 mm
0.9 mm
4x0.8 mm
1.4 mm


Direction (Left Hand)
Yes
Yes
Yes
Yes
Yes
Yes
Yes
Yes
Yes
(F) OUTER SHEATH

Material :
PVC / HR PVC / FRLS
Yes
Yes
Yes
Yes
Yes
Yes
Yes
Yes
Yes


Type & Standard to which it conforms
IS-5831/84, ASTM, IEEE
Yes
Yes
Yes
Yes
Yes
Yes
Yes
Yes
Yes


Thickness min/nominal (mm)
1.4
1.4
1.8
1.4
1.8
1.8
1.4
1.6
1.4


Colour
Electrical chracteristics
(Reqd. for intrinsic safety)
L. Blue
L. Blue
L. Blue
Brown
Brown
Brown
L. Blue
L. Blue
Black
(G) ELECTRICAL PARAMETER

Conductor Resistance
(DC) max. at 20 Deg. C Ohm/Km for each Core
12.2
12.2
36.6
Loop
0.4 / mtr
0.6 / mtr
Loop
0.4 / mtr
0.6 / mtr
Loop
0.4 / mtr
0.6 / mtr
12.2
36.6
12.2


Mutual Capacitance (Max) p F/Km Between Cores
250
250
75
250
75
75
250
75
N.A.


Between Core to
Screen
400
400
120
400
120
120
400
120
N.A.

(H) CHARACTERISTICS OF FRLS SHEATH :
(A)
Oxygen Index
:
Minimum 29% at Room Temperature when tested as per ASTM-D-2863
(B)
Temperature Index
:
Minimum 250 Deg. C at Oxygen Index when tested as per ASTM-D-2863
(C)
Acid Gas Generation
:
Minimum 20% by weight when tested as per IEC-754 Part-1
(D)
Smoke Density Rating
:
Minimum 60% when tested as per ASTM-D-2843
(E)
Flammability Test

As per IEC 332 Part 1 & 2 / 1979